Whether you are a new user of Ancestry or someone who has been using their record collections for a number of years, you might not have noticed a feature when viewing images that may have been actually getting in your way. I'm talking about the "Enhanced images" feature.
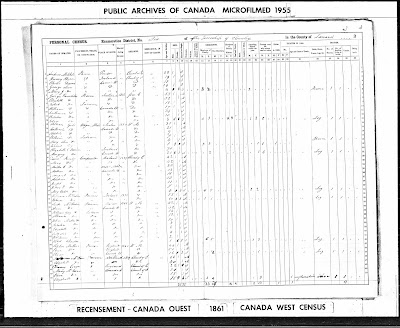
Often I will see an image of a census page, like what is seen above, posted in various online forum. It seems like it is in black and white without any shades of grey. What you are actually seeing is an image that has been manipulated by Ancestry. On Ancestry's "Learn more about the Interactive Image Viewer" page, under the Image Tool section of the Frequently asked questions, we find:
Use enhanced images - When enabled, images are automatically adjusted for light levels. This is helpful for most collections.
Although Ancestry seems to believe that this might help us to read the writing in the images I have found that this adjustment to light levels can also hide faint writing and obscure other potential clues within the image. That is why I recommend to folks that you don't enable this feature unless really necessary.
But how do we turn off the Enhanced Images option?
The first step is to view an image on Ancestry. I usually pick a census record since quite often the appearance of the image going from having the enhanced image option enabled to disabled is more apparent.
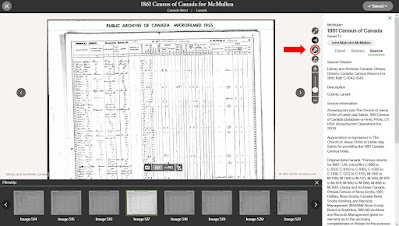
Here is a screen capture from my Windows desktop system viewing that same 1861 Census of Canada West image on Ancestry. You might note that the screen is a bit busy with the source details open on the right side and the virtual filmstrip open at the bottom. It's just how I view the images on Ancestry and you might not have all these panes open.
I've circled in red the icon with a wrench, which is the Tool menu icon, and also added a red arrow pointing to that icon so that it stands out in this screen capture. You will want to click on that icon to display the Tool menu and then click on the Settings menu item to open up all the settings.
 |
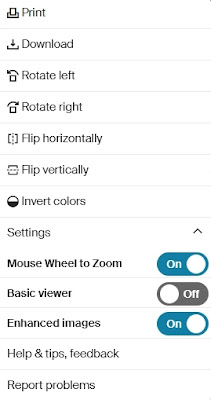
| Screen capture of the Ancestry image Tool menu with the Settings menu item opened. |
Depending on the image you are viewing, there may be additional items you can play with under the Settings option. For example, for the 1911 Census of Canada images you can also turn on and off Highlight Households, Text Tips, Name Labels, and Column Labels. I prefer keeping those options enabled to help me quickly find the family or person I'm seeking.
You can turn off the enhanced images option by clicking on that button beside "Enhanced images". Note, this will affect how all the images will appear on Ancestry. Which in my opinion is a good thing.
As we can see below, the image is now in various shades of grey.
Now when you view an image it will look much closer to what the originally microfilmed image looked like. For the Canadian census images, it looks much closer to what we find on the Library and Archives Canada site.
Additionally, any images that you save to your computer will be saved without any of Ancestry's adjustments to the light levels. With the various grey levels you can even sometimes pick out the writing that might have been added later using a lighter or darker ink. This can be really important when trying to figure out the source of various notations on census forms.
Hopefully this little tip will reveal unseen clues in the various images in the records discovered on Ancestry.


Great tip!!! I had no idea...It's nice that it's something that can be toggled on and off. Also, I didn't realize I could also get rid of the highlighted households - I've often found they're not correct anyway.
ReplyDeleteKen, I always learn something new when I read your blog. Also, I'm always afraid to explore/click-on-stuff- in ancestry in case I can't get back to the page I was viewing. Now, I know I can click on that wrench safely.
ReplyDeleteKen Thank you once again for your tips and help. I read with interest your blog as noted in the eweekly (OGS 2024 02 24) suggesting improvements in virtual document image display regarding the option for enhanced images. I feel it will be very useful in reading scanned images. However when I tired to replicate the formatting you showed in the screen grab, I was able to find the Tool bar to turn off enhanced images, I found the button to display the virtual filmstrip, but have not been able to find how to display complete right hand bar as displayed int the screen grab. I think may be the citation. The image on the blog is too small for me to determine exactly what information you have selected to show. I would appreciate knowing how to turn on this feature showing more inforation.
ReplyDeleteThanks
Edward Avey (aveye@hay.net)
Edward, that information panel on the right side of the screen capture can be accessed by clicking on the icon just above the wrench. On my desktop system the icon consists of a vertical line and an arrow pointing to the left. If that panel is already open, then the arrow points to the right and you can click on it to hide the panel. The information panel can including tabs so show the details from the transcription, related or suggested records from Ancestry, or the source of the record.
DeleteThanks Ken - as always your help is appreciated.
ReplyDeleteEdward